Deploy enterprise grade AKS environments
Hub and spoke infrastructure on Azure for multiple AKS environments
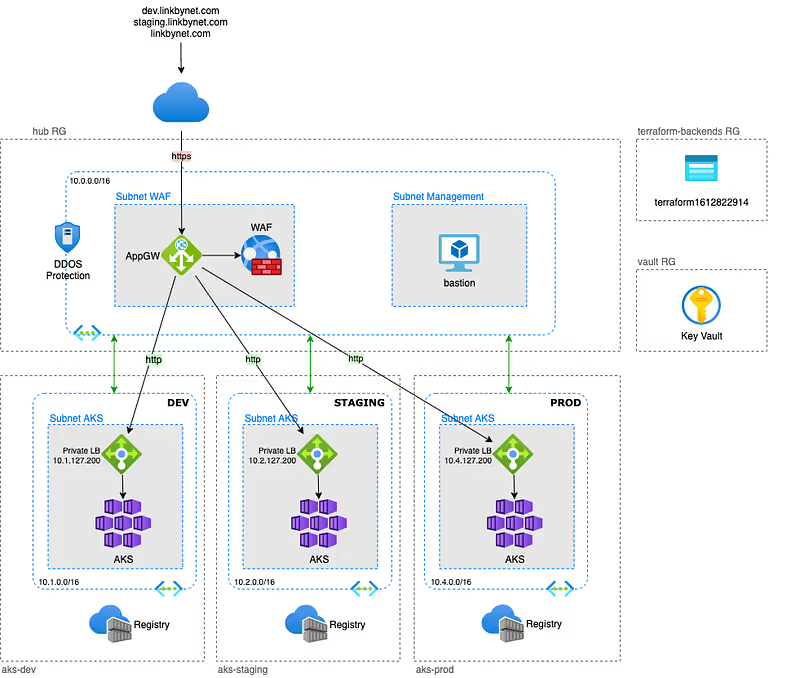
In this article, I will present an example of an enterprise grade Azure infrastructure, based on the hub and spoke model, with multiple AKS environments.
There is a lot of examples on Internet to learn how quickly build an AKS cluster on Azure but it is often without worrying about security or corporate integration concerns. It’s good for making some tests but not really made for production or usage at scale.
With this example, I propose to build an infrastructure with a dedicated AKS cluster for each of the environments while controlling service exposition and using a unique and secured public endpoint.
The public endpoint is implemented by an Azure Application Gateway which is a L7 load balancer, in this example it is also protected with a Web Application Firewall (WAF). The Vnet to which it belongs is also secured with DDOS protection.
Last thing before starting:
- Clone the project from github, the whole article will be based on it
- I use Terraform to provision resources. I work with different infrastructure providers and I really appreciate this tool because of its agnosticity.
- Commands are made for a Linux/MacOS execution platform
Requirements
Azure
Having access to an Azure subscription with a high level of permissions, “Owner” is preferable.
Tools
These tools must be installed in your environment:
Tips: Is it possible to build a Docker base image including all these requirements in order to guarantee that all member of your team and your CI tool use exactly the same environment to work with the project.
Terraform authentication for Azure
Like any infrastructure as code project, Terraform needs a technical identity to interact with the infrastructure provider’s API.
Microsoft Azure offers a few authentication methods that allow Terraform to deploy resources, and one of them is a Service Principal (SP) account.
The reason an SP account is better than other methods is that we don’t need to log in interactively to Azure before running Terraform.
With the other methods (Azure CLI, or Cloud Shell), we need to login to Azure using az login or Cloud Shell.
Follow this procedure to setup Terraform authentication
Here are the main steps you will perform:
- Create a Service Principal using the Azure CLI
- Configure Terraform to use this Service Principal
- Setup Azure AD permissions
Terraform backend
The backend can be provisionned with Terraform, but the corresponding state file will not be stored in a shared storage because there is no configured backend yet, you know the chicken or the egg dilemna.

On the other hand it is created once and rarely needs to be modified. So, we will create it manually with Azure CLI.
Follow this procedure to create the Terraform backend
Vault
Infrastructure stacks often need a secret manager and this corresponds to good practices tu use one. So we will provision an Azure Key Vault before building the hub and spoke infrastructure.
$ cd terraform/vault$ terraform init$ terraform applyThis stack create the Key Vault itself but will also be responsible for maintaining permission delegations to users, groups and applications of the company to consume or manage secrets, keys and certificates.
Deploy infrastructure
In this example project each stack get its own dedicated Resource Group.
Depends on your way of working, you may prefer having the backend Account Storage and Key Vault in a same `Common` resource group, or in the `hub` resource group.
Maybe you haven’t enough permissions to create Resource Group in your subscription and someone else from IT team will provide them to you. In these different use cases you will have to adapt the code a little bit to fit your needs.
The infrastructure we will deploy is divided in two terraform stacks. Each stack contains resources that shared thesame lifecycle.
AKS stack
It implements everything that composes an environment and uses terraform workspace feature to manage multiple environments with the same stack.
Currently, the stack only build an AKS cluster with an Azure Container Registry, but we could imagine instantiating other components in the environment (managed or not) such as database servers, messaging or storage for example.
Follow this procedure to deploy the first AKS environement
Here are the main steps you will perform:
- Create workspaces for each environment
- Create SSH key pair
- Review of project variables
- Deploy the first environment with Terraform
- Get cluster credentials
- Deploy the NGINX ingress controller
- Deploy the demo application
- Check that everything works fine
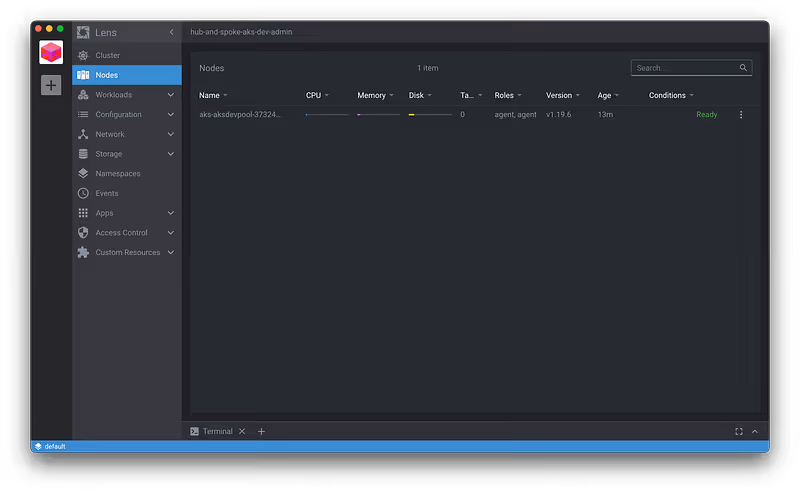
At this step we have an operational AKS cluster with an ingress controller that allow application exposure with a private load balancer.
You can import the cluster in Mirantis Lens, a usefull and free kubernetes IDE to manage your clusters:
Hub stack
It implements the hub containing all cross environment components like connectivity with Internet or datacenter, DNS, eventually a bastion…
Follow this procedure to deploy the hub
Here are the main steps you will perform:
- Review of project variables
- Deploy the hub with Terraform
- Check if the Application Gateway is correctly configured
Now we have an unique and secured public endpoint for accessing applications deployed in our different environments. The Application Gateway receive all the requests and forward them to the right environment according to the routing rules we configured. Then, the ingress controller takes over to route the request to the right service within the kubernetes cluster based on the ingress rules.
End to end test
It’s time to test if everything is working from end to end.
Get the public IP of the Application Gateway and access the demo app deployed in the dev environment by requesting the public IP of the Application Gateway from your host.
You can do it directly from your browser if you use a real DNS of with curl if you use a dummy DNS like me. The most important thing is that the HTTP header must contains the DNS corresponding to both an application gateway listner and an ingress rule in the right AKS environment:
$ curl -H "Host: dev.linkbynet.com" 20.74.8.233
If you get the NGINX welcome page of our demo application, everything works fine, congratulations !
Conclusion
With this project we have covered some important things.
The importance of designing the infrastructure. An enterprise grade infrastructure must take into account global considerations like:
- Scalability and Security
- Separation of responsabilities
- Installation but also day-2 operations
- Access management
This project also demonstrates the importance of coding the infrastructure using development practices. Infrastructure as Code, even more for Cloud infrastructure, make the infrastructure more auditable, therefore more maintainable, and make collaboration and sharing easier within the company.
Thanks for reading. Don’t hesitate to leave me a comment and share your feedback to help me improving this article/stack.
Related content
Initialement publié sur Medium.